5 Steps to PowerPoint Presentation Enlightenment
I’ve been around this great big world of PowerPoint presentations for almost 10 years now, yet only recently have I come to realize the true path to PowerPoint presentation enlightenment…
“The true path to PowerPoint presentation enlightenment is to realize that PowerPoint is a tool that’s intended to enhance your presentation, not deliver your presentation for you or distract from it.”
It sounds obvious, but know this – your audience will begin reading your PowerPoint slide the moment it appears in front of them before you can even begin presenting it. And more often than not, they will finish reading the slide before they begin paying attention to what you’re actually saying. So when PowerPoint is used incorrectly, your audience will already know what you’re going to say before you even say it. Thus, PowerPoint is giving the presentation – not you my friend.
Yet those who have reached PowerPoint presentation enlightenment do not suffer from this destructive PowerPoint tyranny. Instead, they have wrestled back control of their presentations from PowerPoint itself, and eliminated the distractions in the process. Now it is time to summon your inner presentation Shakti and learn how to become one with your PowerPoint presentation – these next 5 steps will show you how…
“5 Steps to PowerPoint Presentation Enlightenment – Wrestling Back Your Presentation from PowerPoint”
➡ STEP #1: Watch Steve Jobs Give a Presentation
Begin your journey down PowerPoint presentation enlightenment by watching Steve’s September 2006 announcement. If anything, catch the first 10 minutes and 1) note the simplicity of the slides and how they effectively and immediately get their point across, and 2) note how the slides emphasize the current point or topic only when Steve turns his attention to them. These are 2 key takeaways which we will explore further in the following steps. (FYI: Although Mr. Jobs does not use PowerPoint himself, you can easily accomplish the same results with PowerPoint – just read on)
➡ STEP #2: Trim the Fat from Your Slides – Less is More!
– Less TEXT is More… Most individuals can only hold 5 to 7 items in short term memory, and as was mentioned before, your audience will read your slides before they begin listening to you. So, you want to ensure that your slides effectively and immediately get their point across. Start by reducing the amount of text on your slides as much as possible. Long lists of bullet points should be avoided at all costs. Instead, utilize brief, “to-the-point”, 2-3 word statements that help reinforce the point you’re making. Do not use complete sentences unless you’re stating a quote or need to keep the original statement accurate. A good rule of thumb is no more that 5 statements and a total of 10 words or less per slide.
– Use an “Easy-To-Read” Font… The extra decorations on serif fonts tend to cause blurring and eyestrain when projected on the big screen. Trim the fat from your fonts by utilizing a sans-serif font for ease of reading.
– Utilize a simple, dark background… Also, try eliminating busy and distracting backgrounds. A light font on a simple, dark background will do two things. First, the dark background will help eliminate glare (and keep your audience from going blind). And second, the dark background will help emphasize the lighter font. Click on the thumbnails below for a quick and dirty tutorial on creating a simple dark background.


➡ STEP #3: Enhance Visual Appeal – Add More Eye Candy!
– Use Pictures… Forgive me for I’m about to spew the most overused and obligatory statement when it comes to pictures, “A picture is worth a thousand words.” Yet the old adage is true and in your journey to PowerPoint presentation enlightenment, pictures are a downright necessity.
 When possible, use a relevant picture or image to help reinforce your point. For an added bonus, use Adobe Photoshop or Illustrator to add some extra appeal to your images. This particular 3D pie chart was created using Illustrator’s 3D extrude and bevel function. Adobe has 30-day free trials available for download from their site if you’re not looking to purchase new software. There are also some free Photoshop alternatives in GIMP and Paint.NET.
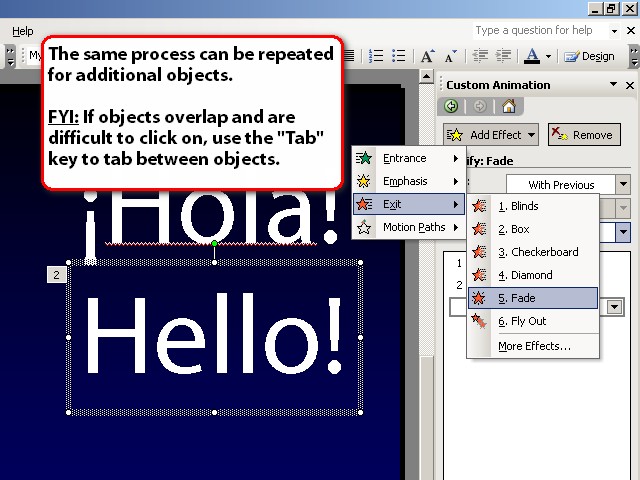
➡ STEP #4: Stop With The Animations – Simply Fade!
No matter how much you’ve grown to love the box, blinds, checkerboard, fly in, and fly out animations, it’s time to let go. No seriously, just put them down and walk away… and don’t turn around. The fact is that these animations are very distracting and a little amateurish in my opinion; they rank up there with animated GIFs and flashing banner ads. Yet if you’re dead set on using some type of animation for your transitions, then settle for a simple yet sexy fade in and fade out. I’ve attached an example (tested on PowerPoint 2003 only) PowerPoint presentation that shows just how nice a fade in and fade out can be, and have included a brief “beginners” tutorial below. Keep in mind that you can also pack more onto a slide by fading in one set of objects while fading out an existing set of objects.


➡ STEP #5: Use a Storyboard – Begin and Finish Strong!
– Tell a Story… Storyboarding is a visual technique used by film and advertising directors to plan out a film or scene. For the budding PowerPoint presenting guru, storyboarding can be used to plan out your key points, visuals/images, and the order in which you present slides. Storyboarding can also ensure that you effectively make use of all the time allotted to you by planning out how many minutes you will spend per slide.
– Begin and Finish Strong… According to the serial position effect, items presented first and last have the best chance of being recalled after your audience has moved on with their lives. Think of it as an opportunity to make a great first and last impression. Use this to your advantage by covering your most important key point at the beginning of your presentation, and restating all your important key points at the end of your presentation.
So now that you’re well on your way to PowerPoint presentation enlightenment, I will give you a few bonus tips to keep you from becoming a distraction after PowerPoint has ceased to do so.
“5 Bonus Tips to Keep YOU From Becoming a Distraction”
➡ BONUS TIP #1: Learn to use PowerPoint
No seriously, I’m not being sarcastic here. If you don’t feel comfortable with PowerPoint, or feel that you are not completely utilizing all the features of PowerPoint, then spend some time tinkering with the program and learning about it. This is a definite must if you’ve ever found yourself completely lost in front of an audience after PowerPoint experienced a hiccup.
➡ BONUS TIP #2: Get a Laptop and Wireless Mouse
Of course this isn’t a necessity, and you might not always have the capability to connect your laptop to the projector being provided, yet there are several benefits to having a laptop and wireless mouse for your own presentation. First, you will be able to practice your actual presentation at home and not have to worry about any compatibility issues between your PowerPoint file and the system it’s being used on. Second, you can use your own purchased/custom fonts that may not be available on all computers. And last but not least, a wireless mouse will keep distractions at a minimum since you don’t have to advance your slides manually with the keyboard/mouse, or ask an assistant to advance the slides for you. Of course, bringing your own equipment might be a pitfall if your laptop or wireless mouse decide to break that day, yet it is something to consider nonetheless.
➡ BONUS TIP #3: Plan Ahead, Memorize and Prepare, and Plan for the Worst!
– Planning Ahead… Always make an effort to find out what equipment will be available, and what options you will have for your presentation. There’s no use in bringing your own laptop if you cannot connect to the projector, and there’s no use in using audio if there are no speakers to play your audio with.
– Memorize and Prepare… If you’ve reached PowerPoint presentation enlightenment, you will quickly realize that your PowerPoint presentation cannot stand on it’s own, so it is up to you to memorize what you’re going to say and practice, practice, practice! Remember, you’re giving the presentation now and not PowerPoint, so no more using PowerPoint as a crutch.
– Plan for the Worst… Of course you can never predict what might go wrong the day of your presentation, so be sure to plan on getting to the location early and having some type of contingency plan if your presentation were to fail on you. At the very least, have a copy of your presentation available with you on a thumbdrive or online in the case that something catastrophic happens.
➡ BONUS TIP #4: Prepare Separate Handouts or Speaker Notes
Again, your newly refined PowerPoint slides will most likely not be understood on their own. So if you plan on handing out copies of your presentation to your audience, supplement your slides with speaker notes to explain what the slide is for. You could also prepare a completely different handout with all your key points and presentation summarized, yet that might more work than it is worth. If anything, your PowerPoint should already have your thoughts written down in the speaker notes, if not, it might be a good idea to start making that a habit. And speaking of habits…
➡ BONUS TIP #5: Stop With Annoying and Distracting Habits, and Start with Good Ones!
In other words:
– Stop reading the slides!
– Stop fidgeting with your hands, the mouse, or things in your pocket!
– Stop saying “um” between every sentence!
– Stop pointing at your slides!
– Stop pacing or rocking back and forth!
…and…
– Start facing your audience at all times.
– Start speaking loudly and clearly.
– Start using good body posture; shoulders back, head high.
– And most of all, start speaking with passion and confidence!
After all, you’re the PowerPoint presentation guru now, so go out there and blow them away with your newfound PowerPoint presentation enlightenment! Have anything to share, say, or add – then feel free to leave a comment!
Sincerely,
The Closet Entrepreneur
» This entry was filed under Presentations and tagged with: Advice, powerpoint, Presentations, tutorial
22 Comments
Ojiaka Darlynton
Great!
Sep 11th, 2007
DPW
Thank you for the enlightenment. I have been using multimedia slides and hyper links with personal narations in my presentations any ideas on using multimedia. by the way those realy dynamic effects in Powerpoint can’t they be used for some presentations.
Nov 11th, 2007
spongeblog
I found this post really helpful as I love experimenting around Powepoint, creating my projects and presentations as beautiful as they can get.
Dec 13th, 2007
TOMAS
@DPW – Multimedia can be a great tool to use in your presentation and I totally recommend it if it makes your presentations more effective in getting your point across. As far as the really dynamic effects in PowerPoint, I would personally use them only if they don’t get in the way. Ultimately though, you should experiment and come up with a presentation style that best fits you regardless of whether or not it follows the “Top X Rules of Presentations”, all that matters is that you get your point across right? 😀
@spongeblog – The things you can do with PowerPoint is limited only by the imagination, so I can only imagine how powerful and elegant presentations will get given enough time and creativity.
Dec 17th, 2007
Ivonne
I love these tips and have used them already. I am facing a major problem: how do i use the powerpoint viewer for 2007 in a computer with a 2003? I tried downloading the viewer to my pen drive but the presentation won’t work accordingly. I cant save the viewer on the computer since it belongs to a company and they have it blocked for downloads.
Thanks.
Jul 23rd, 2008
TOMAS
@Ivonne – I’m not familiar with PowerPoint viewer but it looks like you wouldn’t be able to make use of it or any type of compatibility pack anyway since you don’t have admin rights to the computer you will be using. The option I would suggest would be to try saving the presentation as a pdf or movie file; both options should be available but will limit what you can present (i.e., no effects in pdf and no manual slide advancing as a move). Another thing you can try is uploading the file to SlideShare, yet again you won’t be able to make use of any transition effects or animation (at least I don’t think you will). Hope this helps.
🙂
Jul 23rd, 2008
Kitsune
Thanks a lot- this will help me with my upcoming presentation so much! I’m still working on the “not saying ‘um’ between every sentence” thing though, it’s a hard habit to break!
Mar 15th, 2009
TOMAS
@Kitsune – Believe me, not saying um is something that I still haven’t been able to conquer. Actually, it’s morphed from um to …aand….
🙂
Mar 19th, 2009
ARKAPRIYA SINHA
helpful….. easy reference
Mar 30th, 2009
TOMAS
@ARKAPRIYA SINHA – Thanks! 🙂
Apr 1st, 2009
kertawilastra
wonderful, this what i’ve been looking for. thanks again.
Jul 14th, 2009
TOMAS
@kertawilastra – Your very welcome and glad you were able to find what you were looking for. 🙂
Jul 15th, 2009
Manoj
Hello
Nice site with good tips. However, I have a question. In your sample file (example.ppt) you have inserted a screenshot, which when clicked upon says “Picture Frame” in the task pane, custom animation section. How did you do that? I could not find any documentation on that. Moreover if I attach a sound file after the event that the screenshot appears (Drummer sound) it sometimes works and sometimes not. (There are some things I learnt from this file and hence need to clear the doubts. Thanks)
Sep 14th, 2009
TOMAS
@Manoj – Would it be possible to send me a screen grab of the message you get in PowerPoint? I’ve switched over to using Office for Mac and it’s not quite the same as PowerPoint on the PC, so any additional info would be great.
Also, I’m not sure why the drummer sound isn’t working but be sure to check how the drummer sound is triggered (i.e., automatically starts after last slide, starts when clicked).
Oct 19th, 2009
Leila
Greetings;
This is wonderful webpage. It was great when
I needed imformation fast. It was extremely
helpful. Keep it coming with the advice!
-Leila
Nov 23rd, 2009
Claudia R M
Thank you so much for the info. I am doing my first presentation ever, and you help me greatly.
Keep the info coming.
Nov 24th, 2009
Dhaval Rajesh Patadia
I found this post really helpful as I love experimenting around Powepoint, creating my projects and presentations as beautiful as they can get and This is wonderful webpage. It was great when
I needed imformation fast. It was extremely
helpful. Keep it coming with the advice!
Jun 28th, 2010
Dhaval Rajesh Patadia
This is wonderful webpage. It was great when
I needed imformation fast. It was extremely
helpful. Keep it coming with the advice!
Jun 28th, 2010
Nidhi
Tomas, thank you very much for enlightening. I have my presentation coming next week. I am glad I found your blog 🙂
Mar 4th, 2011
apriliana
Superb!!!
ces advis sont tres bien!
merci bien de votre amazing tips
Mar 14th, 2011
Edila
muito boa a materia sobre 5 Passos para PowerPoint Iluminismo Apresentação.
Nov 2nd, 2011
Leave a Comment